This documentation is to help you configure and place your Affiliate’s Postback pixel within the LinkTrust system.
What is a server side tracking and why is it used?
Server side tracking is one of the most accurate ways to track your campaigns and offers. Many affiliate marketers use server-side tracking to manage their mobile traffic tracking or when they want their normal web traffic to be extra-accurate.
In addition to being more accurate server side tracking is more secure which is why it is primarily used by affiliates when they need data passed back to them. An affiliate may be partnered with many different offers and companies which requires them to use their own tracking/reporting system. In order for clicks and conversions to track in their system we need to pass specific information back onto a pixel and fire it. Here is how you set it up:
1. Identify the values the Affiliate needs appended to the affiliate pixel
- Each tracking system is different and will have different values. In general though an affiliate will usually require a Click ID of some sort, and a transaction ID/order ID.
- Confirm the TYPE of postback pixel as well. These include: ServerSide, JavaScript, Image, and IFrame,
- Identify if this is a global pixel or a conversion pixel. The difference between the two is that a global pixel applies to ALL campaigns the affiliate is assigned to, where a conversion pixel is only for one campaign.
2. Configure the tracking link using AffiliateReferenceID and other parameters
- The Click ID (or unique ID) which the affiliate needs passed back is always going to by a dynamic value, meaning it will change for every click. You will always want to tie this value to the LinkTrust value: Affiliate Reference ID. *keep in mind these edits are made to the affiliate's system's tracking link NOT the link given to them from LinkTrust*
- An easy way to remember how to configure tracking links is: LinkTrust Parameter = Affiliate Token
- Example tracking link: https://AffiliateTrack.com/click.track?cpid=1&affid=1&AffiliateReferenceID={reqid}
- If you or the affiliate has other data you’d like to have passed into the LinkTrust system you can find the appropriate parameter find them in our tokens/parameters list HERE
3. Configure the postback pixel
- The affiliate will give you their pixel and usually have placeholders where they need specific values appended to.
- An easy way to remember how to configure an affiliate pixel is: Affiliate Parameter = LinkTrust Token (just the opposite of the tracking link)
- Example postback pixel: https://AffiliateTrack.com/pix.trk?cpid=1&affid=1&reqid=[=AffiliateReferenceID=]
4. Place the pixel in LinkTrust
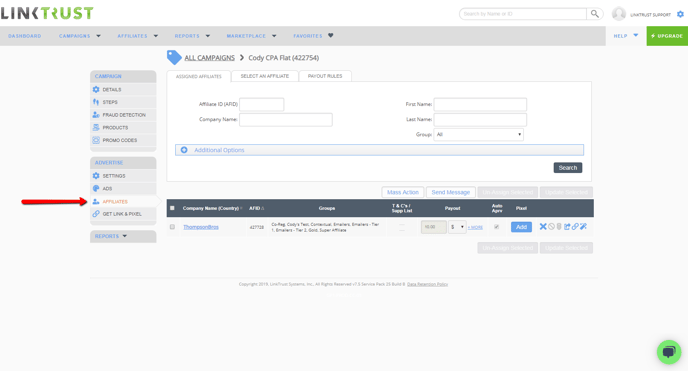
- Within the campaign settings/details you'll want to navigate to the affiliates section located on the left

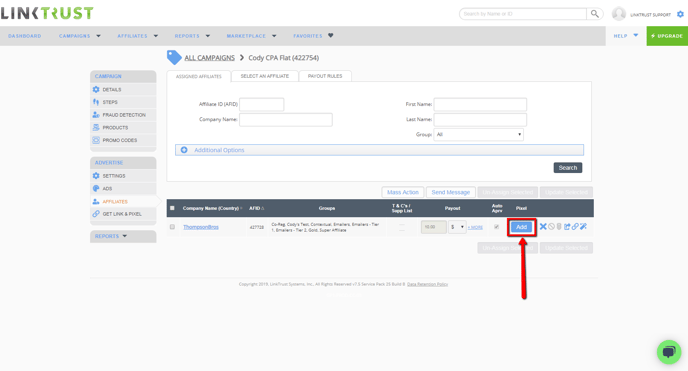
- Once there you'll see a blue "Add" button under the column Pixel. Click on it to add a pixel for that one affiliate

- You will then be taken to another page which will allow you to add the pixel. Click the blue button "Add Pixel"
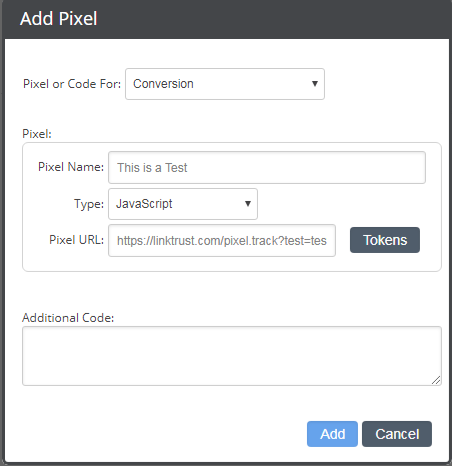
- On the popup select either 'Global or Conversion', add a name to help remember the pixel, select the type, and place the newly configured postback pixel (only the URL) in the area titled "Pixel URL". Then click 'Add' (Screenshot: screencast.com/t/JPLCnn6c)

5. Test
- Run through a few tests using the affiliate's test link to ensure the clicks/conversions are tracking in both systems.
For more information you can visit these links:
- https://help.linktrust.com/knowledge/whats-new/new-way-to-manage-your-pixels
- https://help.linktrust.com/knowledge/campaign-settings/pixel-placement
- https://help.linktrust.com/knowledge/campaign-settings/how-to-place-and-test-an-affiliates-pixel
You can request a demo to see LinkTrust up close and experience how it can help you, or start your free 14-day trial now.
Need help with this feature or have questions? You can contact our support team at support@linktrust.com
